Edgility has launched an Australian first Microsoft integrations – Edgility SMS for Outlook.
Edgility SMS for Outlook
Don’t get lost in their inbox. Send SMS from Outlook and jump the queue.
Why use Edgility SMS for Outlook?
We aim to make communicating with your customers easy, efficient and effective. Edgility SMS for Outlook Add-in will allow you to send SMS (text messages) directly from Outlook, without the need to leave your email environment or export data into another program. Simply click on the Edgility SMS icon on your toolbar to start a conversation.
Edgility SMS for Outlook sits alongside your Outlook inboxes, transforming your simple email environment into a dynamic communications hub. Send SMS instantly by manually adding recipient numbers or by searching and selecting from your contacts. Adding Edgility SMS to Outlook also gives you access to the ultimate conversational tool – SMS Chat.
The SMS Chat feature allows you to efficiently manage conversations as you would with your phone. Edgility SMS Chat is real-time – any inbound messages received will pop up instantly in your chat thread, so you can keep the conversation going.
Why SMS is so effective?
With almost as many handsets in circulation as there are people on earth, SMS is perhaps the most widely accepted form of communication available. 98% of text messages are read by their intended recipient with 3 minutes of delivery. The immediacy and rate of successful delivery make it more effective for reminders, alerts, and notifications than email.

How do I use SMS for Outlook?
Signup
Signup to Edgility by complete the online registration form click here.
We’ll process your application and generate your account within 24 hours.
If you already have an Edgility account, log in and navigate to Integrations > Outlook, click configure.
Download & install the Add-in
You can enable the Add-in within Outlook by:
-
-
-
- Opening a new spreadsheet
- Go to Insert > Get Add-ins
- Type Edgility SMS for Outlook in the search field
- Click Add
-
-
Note: If you don’t see the Edgility SMS Add-in in the Home Ribbon simply click on;
Insert > Get Add-ins > My Add-ins > Click on Edgility SMS for Outlook
In the ribbon that appears at the bottom of the screen click Add
Outlook add-ins are supported in Outlook 2013 or later on Windows, Outlook 2016 or later on Mac, Outlook on the web for Exchange 2013 on-premises and later versions, Outlook on iOS, Outlook on Android, and Outlook on the web and Outlook.com.
Connect Outlook to Edgility
The first time you use Edgility SMS for Outlook, you will need to connect Outlook to your Edgility account using your API keys. To set up an API key, log in to your Edgility account:
1. Navigate to Settings > API Keys
2. Click Create API Key.
3. Enter a Name (for example; Outlook) for your API Key, the status will be set to Active by default, and click Save.
To complete the setup of your Edgility SMS for Outlook Add-in, copy and paste your API details into the Add-in screen and click Connect to get started.
Once your Add-in is connected, pin it to your mailbox for quick sending by clicking the pin icon in the top right corner.

Sending from Outlook
Sending SMS from Edgility SMS for Outlook
Sending SMS using the Edgility SMS for Outlook Add-in is fast and efficient. There are 2 ways to send SMS from your Edgility SMS for Outlook Add-in:
SMS Chat
SMS Chat works just like messages on your phone, with chat threads grouped by the recipient. Each message thread will be chronologically displayed. Chat is real-time, meaning inbound messages received will pop up instantly in your chat thread, so you can keep the conversation going.
1. To start a new chat, click the + or ⋮ icon from the top search bar
2. Enter your recipient’s number and click Create Chat
Note: If the recipient’s number is not saved as a contact in your Edgility account, click on the Add Contact icon in the top left to enter their details. This will make it easier to identify the in your chat inbox.
3. Use the message composition options to compose your SMS.
From
Use the From dropdown to select your Sender ID – this is what your SMS is sent from, the name or number that appears as the sender when your contact receives the SMS. Here are your options:
If you would like your recipients to reply to your SMS
-
-
- Shared Local Number – Replies to Web Inbox & Email (Allow Replies)
This is a shared pool of mobile numbers that allow you to receive replies to SMS sent. Numbers are randomly selected, so recipients receive messages from a different number each time you send. This is free to use and receive replies. - Virtual Number – Replies to Web Inbox & Email (Allow Replies)
You can purchase a Virtual Number from your Edgility account (pricing and availability vary per region). This number is assigned to your account exclusively to send and receive messages, so recipients receive messages from the same number each time you send. - Sender ID – No Replies
Replace the sender number with a word like ALERT, URGENT or send from your brand name, by setting up an Alphanumeric Sender ID (availability varies per region). Telecommunication protocols limit an Alpha Sender ID to a maximum of 11 characters long and cannot contain any spaces or symbols, so you sometimes need to get creative with abbreviating longer names. Recipients CANNOT reply to messages sent using a Sender ID. - Own Number – Replies to Your Mobile
As your mobile number is verified at signup, you can send SMS from Edgility SMS using your registered mobile number. Replies to messages sent using your own mobile number will be received by your mobile therefore not received in your Edgility account.
- Shared Local Number – Replies to Web Inbox & Email (Allow Replies)
-
Your Edgility SMS Sender ID is managed from your online account. To add a new Sender ID or manage an existing one simply log in and navigate to Profile > Allowed Sender ID’s
Message
Type the content of your SMS into the Message box. Each character is counted to ensure you know how many message parts you are sending. 1 standard SMS contains 160 characters.
Templates
Use the Templates dropdown to select from pre-saved SMS templates.
Your Edgility SMS templates are managed from your online account. To create a new template or manage an existing one simply login in and navigate to SMS > Templates
Your Edgility SMS templates are managed from your online account. To create a new template or manage an existing one simply login in and navigate to SMS > Templates
4. Click Send Message to submit your message to your recipient. The message will immediately appear in your chat thread.

Send Campaign
1. Click on the Edgility SMS for Outlook Add-in in your Home menu ribbon to open the Add-in, then click Send Campaign.
2. Use the Recipients dropdown to select or search recipients from your saved Edgility SMS contacts or manually enter or paste numbers in the recipient field.
3. Enter a Campaign Name (optional) to identify the campaign in your Edgility SMS reporting
4. Use the From dropdown to select your Sender ID – this is what your SMS is sent from, the name or number that appears as the sender when your contact receives the SMS. Here are your options:
If you would like your recipients to reply to your SMS
-
- Shared Local Number – Replies to Web Inbox & Email (Allow Replies)
This is a shared pool of mobile numbers that allow you to receive replies to SMS sent. Numbers are randomly selected, so recipients receive messages from a different number each time you send. This is free to use and receive replies. - Virtual Number – Replies to Web Inbox & Email (Allow Replies)
You can purchase a Virtual Number from your Edgility account (pricing and availability vary per region). This number is assigned to your account exclusively to send and receive messages, so recipients receive messages from the same number each time you send. - Sender ID – No Replies
Replace the sender number with a word like ALERT, URGENT or send from your brand name, by setting up an Alphanumeric Sender ID (availability varies per region). Telecommunication protocols limit an Alpha Sender ID to a maximum of 11 characters long and cannot contain any spaces or symbols, so you sometimes need to get creative with abbreviating longer names. Recipients CANNOT reply to messages sent using a Sender ID. - Own Number – Replies to Your Mobile
As your mobile number is verified at signup, you can send SMS from Edgility SMS using your registered mobile number. Replies to messages sent using your own mobile number will be received by your mobile therefore not received in your Edgility account.
- Shared Local Number – Replies to Web Inbox & Email (Allow Replies)
Your Edgility SMS Sender ID is managed from your online account. To add a new Sender ID or manage an existing one simply log in and navigate to Profile > Allowed Sender ID’s
5. Use the Templates dropdown to select from pre-saved SMS templates.
(To create templates, login to your Edgility account and go to SMS > Templates)
(To create templates, login to your Edgility account and go to SMS > Templates)
6. Type the content of your message in the SMS Message box. Each character is counted to ensure you know how many message parts you are sending. 1 standard SMS contains 160 characters.
7. Click Preview Campaign to view your Campaign Summary before sending
8. The Campaign Summary will detail exactly how many numbers you are sending to, the length of the message, and calculate the cost of your campaign in SMS credits.
9. Click Send Now to submit your campaign for delivery

Hiding or removing Edgility SMS for Outlook Add-in
To remove the Edgility SMS for Outlook Add-in, simply right click on the Add-in in the menu ribbon and select Remove Add-in.
Get Add-Ins button not appearing or greyed out in Outlook Menu Ribbon
There are a number of setting and confirguration issues that could be causing this issue.
Below are some troubleshooting scenarios to consider – feel free to contact us if you are unable to resolve the problem.
Scenario 1.
Browse to user’s Outlook profile. Click on File -> Options -> Trust Center.
Then click on “Trust Center Settings” buttons.
Then go to “Privacy Options” -> Select Privacy Settings…
The privacy Settings prompt box will launch.
See if “Enable optional connected experiences” check box is unchecked.
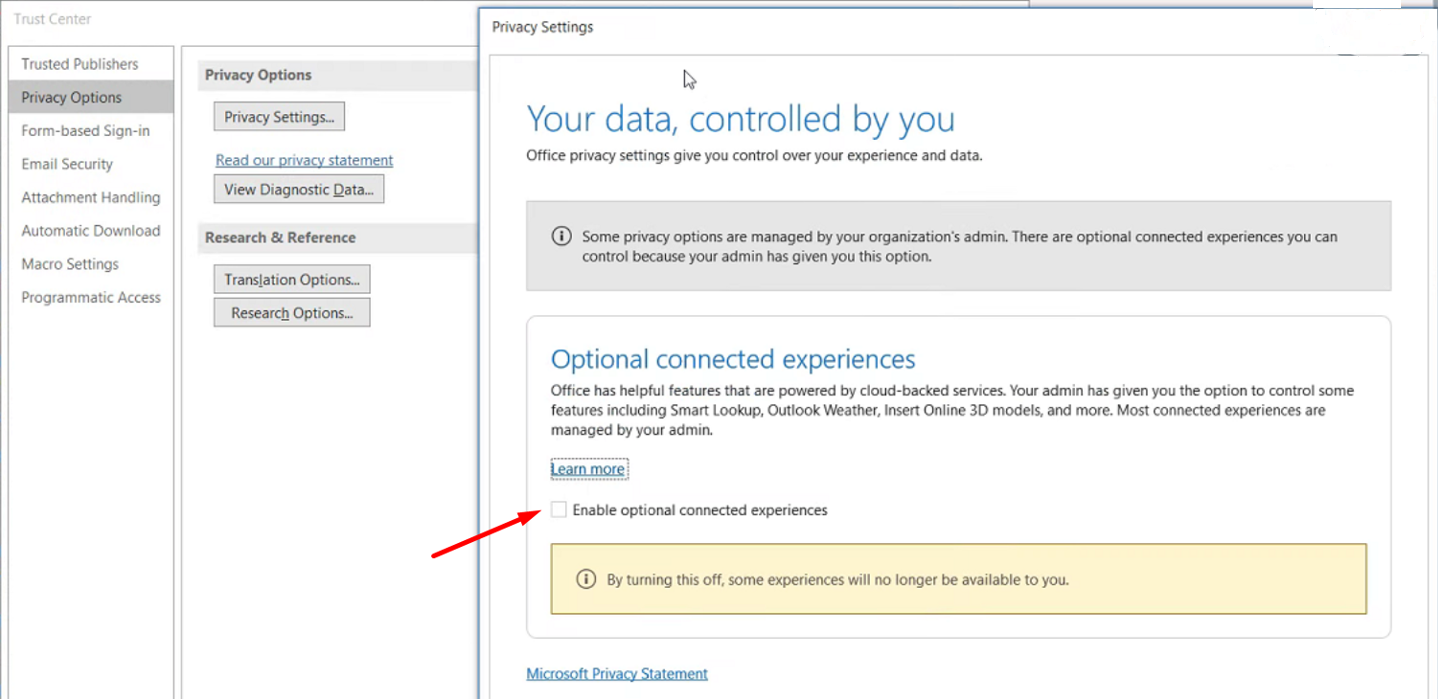
If unchecked, please check the message box.
This should fix the “Get Add-Ins” button in user’s Outlook profile.
Scenario 2
In Outlook:
-
-
- Go to File -> Options –> General
- Click the “Privacy Settings” button.
- If the “Enable optional connected experiences” button is not checked, the ‘Get Add-Ins’ button (among other functions) will be greyed out. Check it.
- Restart Outlook and the “Get Add-Ins” button should be visible now.
-
Scenario 3
Sometimes, the Outlook account is connected via IMAP / POP3 instead of a direct connection with the Exchange server. You need to sign out and then sign in with your credentials to connect the account again.
To check the connection type:
-
-
- Click the File tab. Click Account Settings, and then click Account Settings.
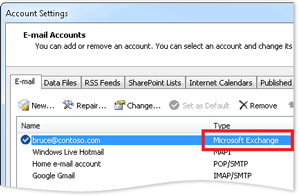
- On the E-mail tab, the list of accounts indicates the type of each account.
- It should like below. Check if your account is connected as “Microsoft Exchange” (the desired option).
- If it is connected as IMAP/POP/MAPI, sign out and sign back in with your Exchange / Office 365 credentials directly.
-
Using a different mail provider through Outlook? eg. Google
Unfortunately, you need to be using an Exchange mail account to take advantage of Add-ins in Outlook – it won’t work with account from other providers like Google.
The office addins only work with office 365 accounts – either business accounts or outlook.com. If you have both office 365 and IMAP in the profile, the addins only work in the 365 account.
Scenario 4
-
-
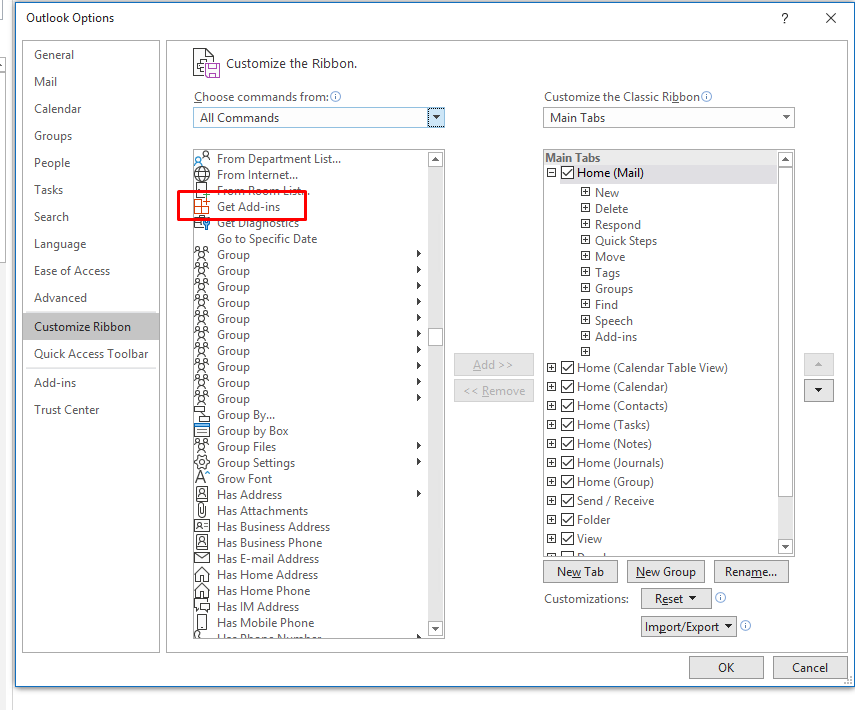
- Go to File -> Customize Ribbon
- If you see “Get Add-ins” on the left, create a group first by clicking on “New Group” and then move the “Get Add-ins” button to the right side.
-
Scenario 5
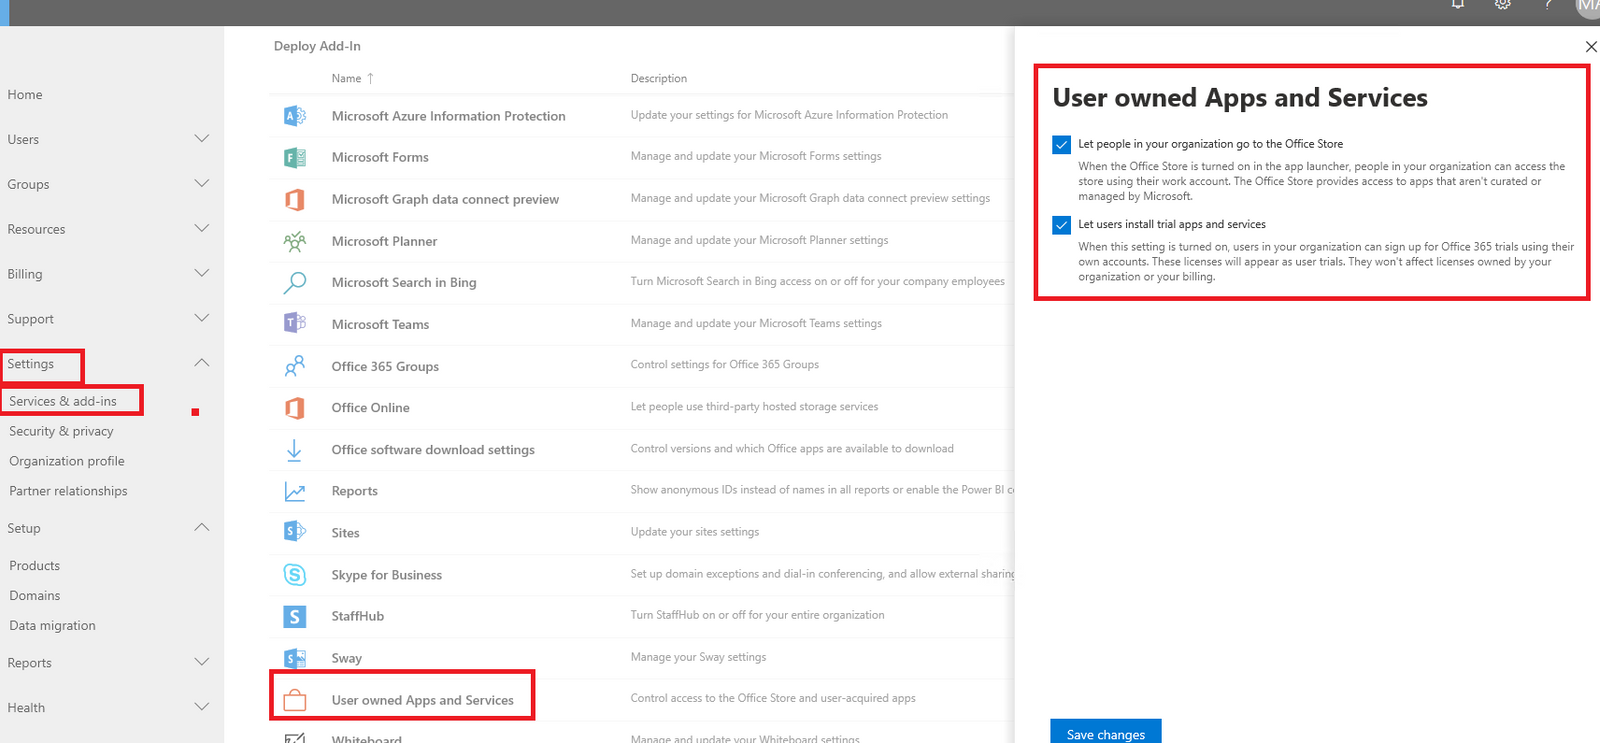
It is possible that your Admin has disabled third-party Add-ins.
Ask your Admin to sign into Office 365 with an admin account.
They can then navigate to Admin center -> Settings -> Services -> User owned Apps and Services as the following picture shows and must enable both the options.